
Frequently Asked Questions / Help!
Workout Plans
Starting with version 6.2.0 iSmoothRun supports auto-sync of Training Plans from Training Peaks, Final Surge
If a pro-subscription is purchased then the app will automatically sync and download scheduled workouts from the sites mentioned above. The workouts will appear in two places.
1. In the Calendar view of the log view. The days that have sceduled workouts will be marked with dots. If you seelect them you can see the workout and select it.
2. In the workouts tab you will see the 3 workouts that are sceduled for the current day the one before and one after. These wokrouts will also be available on the apple watch. To select them on the apple watch press Start Session and then select "Free" to see the list with available workouts
Importand Apple Watch Notice
Due to Apple's restrictions the phone app cannot initiate a data transfer to the watch. So if you want to sync workouts with the watch will need to load the watch app while within range with the phone and tap start a session. As soon as you see the workouts listed, you can use your watch is standalone mode and run without the phone.Importand notice for Training Peak users
If have already authenticated the app with Training Peaks before you purchased the Pro features, you need to re-authenticate to Training Peaks so you can give permission to the app to read your workout plan
Apple Watch
The iSmoothRun Apple Watch App can be used both as an external display for the phone app, or as a standalone app to record your run. In both cases the app can use AW HRM and can display up to 8 metrics in two pages, customizable with three available templates by the user.
Modes of Operation
The iSmoothRun Apple Watch app can operate in two modes:
Watch + iPhone
In this mode the recording (GPS and Pedometer data) is done by the phone. The apple watch is used only as an external Display and a HRM. Audio Cues are emitted by the phone app so the earphones must be connected to the phone.
Watch Only
This is the preferred mode of operation. The AW app works in standalone mode and no communication is done between the watch and the phone app (as far as iSR is concerned). The app will use the sensors of the Watch. These are GPS, Pedometer, Altimeter and HRM. You can leave your phone at home. If you have your phone with you, switch off Bluetooth. Although the app uses the watch's GPS, Apple will use the phone for GPS info if the two devices are connected, which usually results in poor location data.
Bluetooth Sensors with the Apple Watch
You can connect up to two Bluetooth sensors with your Apple Watch iSmoothRun App. iSR supports all BT standard sensors and can also read custom metrics from Stryd and Milestone Pod.
In order for a sensor to be used, you need to pair it first in iSR app->Settings->Sensors->BT Smart Sensors. Next you need to pair the sensor with the Apple Watch iSR app. While the phone is in range, open the iSR Watch app, go to the leftmost screen, press settings->BT Sensors->Scan For Sensors. The sensor must be activated, then it will appear in the list and you just press OK. This has to be done once. Whenever an activity is started the app will try to connect to the paired sensors and use them if they are active.
There is an exception. HRMs should not be paired with the iSR watch app. Instead you should pair them in Watch's settings->Bluetooth->Health Devices. This way the management of HRM is done by Apple. If the BT HRM is active the watch will use this instead of the build in, while if the HRM is not active the watch will fire the internal HRM. From the point of view of the app this is transparent. The app asks for HR data from the watch and Apple does what's best
Sensors must be paired in the "Settings->Sensors->BT Smart Sensors" section in the phone app and not the "wahoo section" even if they are Wahoo sensors
Data Sync between the Watch and the Phone
The watch app doesn't keep any data but offloads everything to the phone. When the two devices are in range the watch will try to send workout data to the phone as soon as a workout is finished. If the phone is not in range, the app will try again whenever it is loaded in the foreground. This means that when you return from a run, and the phone is in range, load the iSR watch app so the run is uploaded to the watch. The phone cannot communicate with the watch app if the watch app is not active in the foreground.
Any change that you do to your workouts, settings etc cannot be automatically pushed to the watch. To do this, load the iSR watch app when the devices are in range and press settings->sync data, or press "Start a Session" and wait on the session setup screen. Within 10 seconds you should see the new options or settings.
How to setup your pages
Go to the phone app -> settings -> Displays -> Apple Watch -> Setup.
There are two screens available. On each one select the template you want to use. First one has three metrics of equal size, second one three metrics with first in large font and the other two smaller and the third one has four metrics.
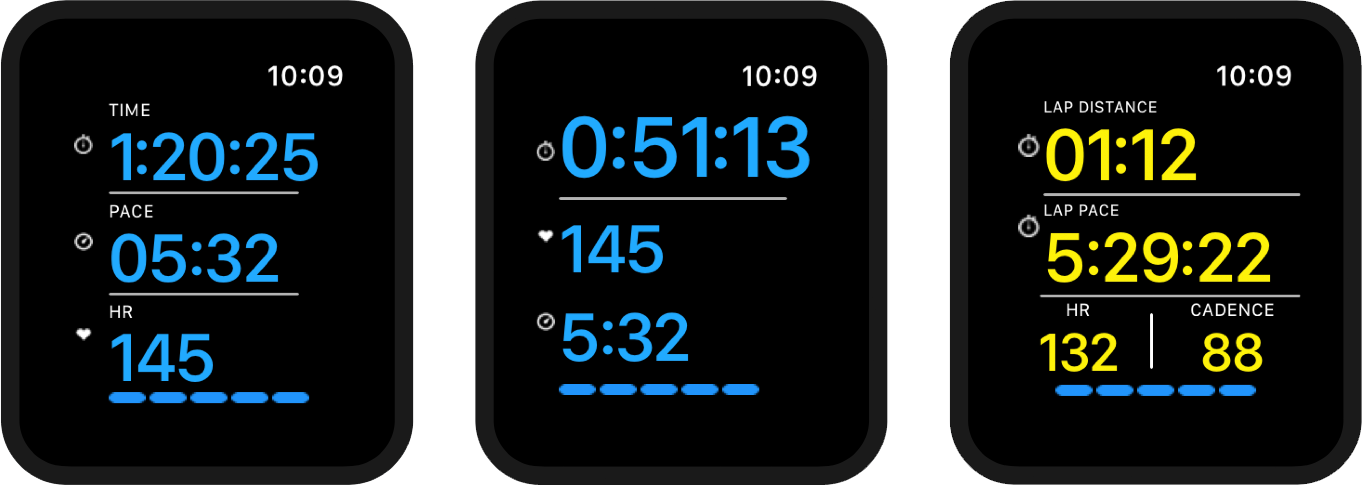
After you select the template tap on each one of the metrics and select the ones you want to use. Repeat for the second page. The available metrics are "Lap Calories", "Calories", "Lap Count", "Lap Time", "Time", "Total time", "Time Of Day", "Time Ahead/Behind Target", "Distance", "Lap Distance", "Average Pace", "Lap Average Pace", "Split Average Pace", "Pace", "Average Speed", "Speed", "Lap Average Speed", "Max Speed", "Cadence", "Average Cadence", "Lap Average Cadence", "Steps", "HeartRate", "Heart Rate Zone", "Lap Average HR", "Average HR", "Lap Max HR", "Max HR", "Lap Min HR", "Min HR", "Power", "Altitude", "Ascend", "Lap Ascend", "GPS Signal".
How to use Apple Watch HRM
Please check again the HR switch in the app settings->Displays->Apple Watch and check that the app can read HR in Apple's Health app ->sources->iSmoothRun
Check the watch settings->general->workout->Power Saving mode is switched off.
A watch reboot might be needed as well, especially after new installs
Also start the run from the watch and not the phone.
Splits, User Laps and Interval Laps
The app runs 3 (+1) concurrent/parallel "Lap" systems during the run.
- Intervals/User laps. If a free workout is selected they are activated with the user "Lap button" press. If a workout is performed laps mark the different sections (automatic). Pressing the lap button advances to next interval. User/Interval Laps are communicated to the user through Audio cues and a popup window on the Apple Watch
- Splits. These are "auto laps" of 1 km or 1 Mile (not configurable). On the Apple Watch they are communicated to the user with a pop up screen, similar to the one of a finished Interval
- Song laps. (iPhone only) When with iPhone the app will record a lap for each song, so you get song stats in the log and you know which was your fastest song
- Audio cues are totally independent. These resemble laps in that they announce statistics to the user, but they are not recorded. The first 3 lap systems are recording their stats and you see them after the run has finished. Audio cues are automatically disabled when performing workouts with sections less than a mile or 8 mins. This is so you don't get overwhelmed by the audio feedback, since it's the interval info you are interested.
How to trigger a User Lap or an Interval
On the iPhone you can trigger a Lap by pressing the lower right "red" button on the recording screen. On the Apple Watch you can find a lap button in the leftmost screen or you can use the simultaneous press of the two hardware buttons. For the latter to work you need to disable the "screenshot" function in AW's settings, and set the button press to "Lap" instead of "Pause/Resume" in iSR phone app > settings > Displays > AW.
A popup screen will display the most important statistics of the of the finished lap. It will remain for 15 seconds, but you can dismiss it by tapping on the top left corner of the screen (this way all popups can be dismissed).
There are specific metrics that can be added to the recording screens that help you track your Lap, like:
"LapCount"
"Lap/Interval Time"
etc..
General Information
If you are a first time user make sure you watch this video for a walkthrough of the main features
Proximity Sensor and Automatic Screen blanking
The app can use the proximity sensor to blank the screen automatically when the phone is covered. The proximity sensor is located near the earphone. Cover the earphone with you hand (while the app is recording) to test the proximity sensor. You can disable the proximity sensor from settings->proximity
GPS Quality
A few words on GPS signal quality and accuracy. GPS accuracy is not controlled by the app (or any app) but by the device. Apps only define what are the accuracy requirements for the specific use. We run the iPhone GPS unit always on maximum accuracy mode (it doesn't have much impact on the battery). Any app would give exactly the same results (you can run two apps in parallel to check). We usually give better results than other apps, when there is no GPS signal and other apps give positions from WiFi spots or cell towers, while we switch to pedometer till we get a satellite fix again.
Treadmill
iSmoothRun can also be used on treadmill runs. In such cases the pedometer is used. The pedometer accuracy for a treadmill run is expected be within 10% of the actual distance.
Please select the "Treadmill" activity so the app won't take into account GPS signal
The phone should be firm on the body in an armband or a waist belt.
You should have completed 10-20 miles outdoors with the phone in the same position and good GPS conditions.
When you stop your run and you are presented the last "save" view, you enter the correct distance. This will be also taken into account for the next run. You can also correct the distance after the run is saved if you edit it in the log.
Auto Pause
Auto Pause in iSR is based on the data from the pedometer. So it is very responsive unlike other apps that try to use GPS for the same purpose. You should set the auto pause time (in advanced settings) to a value between 5 and 10 secs. This time is subtracted when autopause kicks in, so you don't have to worry about your statistics.
If a stride sensor is used then autopause is based on stride sensor data
If the activity is Cycling or MTB, if a speed sensor is connected then this is used for autopause. If not, then the GPS data are used. In this case you have to set the minimum speed threshold in advanced settings
Countdown Timer
Unlike other apps iSR doesn't need a countdown timer. You can safely press "start", and go on with the rest of your preparations. The app will start and after 5 secs (or whatever the autopause threshold is) it will autopause. Then the chronometer will reset to 0. Whenever you start running the app will start automatically. Just enjoy your run!
Heart Rate Recovery
The HRR tool can be found in the settings tab after starting a run. If you tap the button, the App will countdown 60 secs and record the HR drop. That's your Heart Rate Recovery and it will be logged. The bigger the better. Small HRR may indicate fatigue.
Because the phone might be in an armband or a waist belt by the time you take your phone out and search for the tool the HR might have dropped already 10 beats. So to solve that problem we coupled it with AutoPause. When Auto Pause kicks in it records the time and heart rate of the last step (not AutoPause activation time but last step time), and these values are used by the HRR tool. So after your last interval, or when your HR is high, stop, take the phone out wait for AutoPause to kick in and then tap HRR. Stay relaxed until the measurement finishes.
Deleting an item (workout session, interval, sensor etc)
A very common question is how to delete a run, or an interval etc. To delete an item in a list, just swipe it. This is a very standard gesture, it works on all lists that contain items that can be deleted and works on most iPhone apps. Note for iOS7: "Swipe to delete" works only from right to left
Problems with a Withings Scale
If you paired your app to a Withings account and the reported weight is 0.0 here is what you have to do: "The user can go to http://my.withings.com, login, then click on “share”, “share on my website” and once there “Enable sharing of my weight / my BP"
User Profile
Units
- Distance
- Miles or Kilometres can be used. Pace is measured in mins/mile or mins/km accordingly. Elevation and climb is measured in ft or m
- Weight
- Weight can be measured in either lbs or kg
- Temperature
- Celsius or Fahrenheit can be used for the reported temperature in weather logging
Distance and Weight units can be set independently so you can choose km and lbs
Heart Rate Zones
Five heart rate zones can be defined, and will be used for HR Zone based workouts. You define separate zones for running and cycling. Heart rate zones are defined either with absolute HR values (e.g. 155 - 167) or as a percentages (e.g. 80% - 90%).
If they are defined as a percentage the formula used takes into account both resting HR and maximum HR.
If you want the percentage to be calculated only as a function of maxHR set resting HR to zero
Audio Cues
iSmoothRun uses Audio messages to inform you about your run and coach you during your workout. It will duck (lower) or pause the volume of the music according to the settings you provide.
Audio Cues Settings Explained
- Mute
- If switched on the Audio is muted
- Per Time/Per Distance
- You can choose if you will hear the audio messages at the predefined time or distance
- Pace, Cadence, Heart Rate, Time, Distance and Workout Avg Pace
- With these switches you can control what messages you'll hear. Time and Distance are measured from the start of the run. Pace, Cadence and Heart Rate are the average values in the segment between two messages. Workout Average Pace is the Average pace from the start of the Run. If you are on a workout with a "Warmup" section, Workout Average Pace is calculated from the end of the warmup.
- Interval Coaching
- If you are on an Interval or Steady Section the app will try to keep you within your targets. If the section is HR based the messages "Below Zone/In Zone/Above Zone" are used. If the section is Pace based the messages "Faster/Steady/Slower" are used
- Interval Statistics
- If switched ON, you will hear statistics about the interval or steady section (distance, time, average pace, average HR) at the end of the interval.
- Interval Ghost Pace
- If switched ON, at the start of each Interval or Steady section that is pace targeted, a ghost runner is created running at the predefined pace. The app will inform you about how many seconds you are, ahead or behind the ghost runner. Interval Ghost pace can be used to fine tune your pace down to the second
- Ghost Run Cues
- The time interval where you get the messages about the Ghost Runner. The Ghost Runner is created either for pace based workout sections with the above setting, or by running against an old run of yours by selecting it in the Log and tapping "Ghost Run"
- HR Zone Change
- iSR will inform you every time you cross a HR Zone boundary with messages in the form "Zone 3" etc
- Units in Messages
- If switched OFF you won't hear Units (e.g. min/mile etc)in messages.
- Hydration/Nutrition
- Alarms. These two alarms can be used to remind you to hydrate or eat your gel at the predefined intervals
- Duck/Pause Music
- Here you can control the Audio behaviour. It should be noted that Pause works only with the native "Music" app
- Speed/Volume sliders
- With these sliders you change the relative volume of messages and the speed of the playback. It should be noted that the volume of the messages is the combination of this slider and the iPhone volume as it is controlled by the side controls. Thus you can control the volume of the App relative to the music. Also take note that the side controls affect the Audio only when Audio/Music is playing. Otherwise they affect the ringer volume which is irrelevant to Audio.
- GPS Status
- This switch controls wether the messages "GPS ON / Switching to Accelerometers" are used whenever the App switches tracking mode
Workouts & Intervals
For Instructions on how to setup a custom workout please watch the video on the right. In general you create a library of intervals/steady/warmup/cooldown sections, and then you can use them to compose your workout.
Audio Coaching
Heart Rate Zone
When you define a target HR zone for an interval or a steady section, the messages Below Zone/In Zone/Above Zone will be heard during the workout.
Pace
If pace is the target of the interval/steady section then the messages are Slower/Steady/Faster. We internally create a zone around the target pace (+-10 secs aprox). Pacing quality can be poor depending on local conditions, when only GPS is used. You can disable the messages with the appropriate switch (Audio Settings->Intervals Coaching) Pacing can be done very effectively if a stride sensor (footpod) is used. A stride sensor is very accurate, with fast response time and the app can give excellent pacing (within 5 secs) with minimum audio interruptions. Ghost pace can also be used for pacing very effectively (see below).
After the end of each Interval, interval statistics are spoken.
Short Recoveries
If the recovery is short interval statistics are skipped. The same is true for short intervals where the word Fast is only heard after the interval.
Ghost Pace
Another option that can be used very effectively for pacing is the "Interval Ghost Pace". When enabled a "Ghost runner" running at the predefined pace is created automatically, and you are going to get Audio updates at the specified intervals, about how many seconds you are ahead or behind. A 2 minute setting is advised
Countdown cues
When performing an Interval or steady section you will also hear messages from a countdown timer. If the section is "Distance based" you will hear cues at 800, 400, 200 and 100 meters from finish. If the section is "Time based" you will hear cues at 4 minutes, 2 minutes, 1 minute and 30 seconds from finish.
Using Sensors
Supported sensors
iSmoothRun is the app with the most extensive sensor connectivity
We support ANT+ sensors through the use of the 4iiii Viiiiva BTSmart HRM or the Wahoo RFLKT+ display
BT Smart (BTLE) HRMs (like Wahoo BlueHR or Polar H7) are supported natively.
Wahoo Blue SC, BT smart cycling speed/cadence sensor or any BTSmart compatible cycling sensor is supported.
BT Smart footpods like the Polar Stride Sensor BTSmart are supported
Stages BT smart power meter is supported natively.
Stryd running power meter is supported
Support for KICKR trainer as a Power meter. Full support (ie driving the KICKR based on the workout) will come in the first quarter of 2014
ANT+ Sensors
ANT+ sensors are supported only through the use of the Wahoo Fisica Key or the 4iiii Viiiiva BTSmart HRM . We support HR sensors, stride sensors and Cycling combo speed/cadence, speed and power sensors.
We don't support the Garmin or Adidas dongle for the simple reason that these companies don't provide an API (software lib) so that 3rd party developers can connect their Apps.
How to pair your ANT+ Sensor
If you use a Wahoo Dongle- Go to settings wahoo Fisica sensors Add ANT+ HR.
- When the sensor is found press "Pair With sensor"
- If you go back to the previous menu you should see "Paired with #(sensor number)"
- Now go to the first tab (New run) and press "Start your run".
If you use a 4iiii Viiiiva
- Use the 4iiii iPhone app to Connect to Viiiiva pair the ANT+ sensors with Viiiiva
- In the 4iiii Viiiiva app, tap "Release Viiiiva to other apps"
- Go to iSmoothRun settings 4iiii Viiiiva
- When the sensor is found enter the correct values for "Wheel Circumference" (cycling sensors) and "Correction Factor" (footpods). If you don't have a cycling sensor or a footpod leave the default value.
- Tap "Pair With sensor"
- Now go to the first tab (New run) and press "Start your run".
If a HRM is connected an "H" will be displayed on the top right of the recording dashboard. If a footpod is connected an "F" and if a cycling sensor is connected a "B". You can also check the status of the key and the sensors "connected/disconnected" in the settings tab
HRMs
The trick to get correct data from a HRM is to make sure that is wet. Putting it under the tap before starting is a good solution. You should also make sure that is tight enough (especially during running).
Footpods
A footpod (or stride sensor) is a sensor placed on the shoe that can calculate the distance and pace of a runner. The out of the box error of a stride sensor is around 5%, where if calibrated it can be 2% or less. A footpod has very consistent operation and contrary to GPS, has very fast response to the runner's change of pace. Thus it can be used very effectively for pacing and it's strongly advised for runners that follow a pace based training plan.
The footpod calibration includes the calculation of a correction factor. The factor is simply multiplied with the distance reported by the footpod and gives us the true distance.
Calibrate your footpod
- If your sensor is not presently paired, pair the sensor.
- Choose "distance from stride"
- Run a known distance ( in a track, or on a straight line measured with Google maps). On the main recording screen it should have an "F" symbol on top right. On the settings tab while running there should be a row with the message "Stride sensor:Connected"
- Upon completing your run, stop the workout. Check the distance recorded by iSmoothRun. Your calibration factor (CF) is determined by dividing the known value by the value recorded by your footpod. For example, suppose you knew the distance to be 1km and iSmoothRun calculated it to be 1.02km (based on your footpod). Go to the view where you paired the sensor and add CF 1./1.02 = 0.98.
Cycling sensors
ANT+ speed, cadence, combo speed/cadence power meters and the Blue SC are supported. Up to four cycling sensors can be paired. At start the app will search for them and connect with the first found.
Custom Activities
Apart from the predefined activities (Running, Trail Running, Walking, Hiking, Cycling and MTB) the user can define any number of Custom Activities. This can be done from Settings->Custom Activities.
A custom Activity is defined by the sensors that are going to be active.
- Cadence
- Cadence refers to the internal pedometer. Can be used if cadence tracking is desired, for example rope jumping.
- GPS
- GPS should be on for outdoor activities where a distance is traveled, for example rowing, skating, horse riding.
- Stride Sensor
- Stride sensor refers to activities where a ANT+ stride sensor will be used.
- Cycling
- Cycling refers to activities where a cycling ANT+ sensor is going to be used.
- HRM
- HRM is default ON. the user doesn't have to choose anything, if a HRM sensor is active during the activity it will be used.
- Auto Pause
- Auto Pause will turn on the auto pause detection mechanism, depending on the sensors used.
- Caloric Expenditure
- The user can also define the caloric expenditure of the activity as calories per hour. If a HRM is used the app will calculate caloric expenditure based on HR.
Examples of setup are (Skating GPS and HRM, Aerobics HRM, XCountry Skiing GPS and HRM, Zoumba HRM, Cycling on a Trainer: cycling sensor and HRM etc)
Runkeeper Users
Especially for RunKeeper users, the HR curve is exported with the time in minutes exported as distance in meters so the site can accept the data and produce some meaningful graph. The distance is small nevertheless and cannot spoil the user's statistics (for example 3 hours of weekly aerobic indoor activity will add 180 meters/0.1 miles in the user's statistics).
How to add a manual entry or schedule a workout
So you didn't record a workout but you want to manually enter it in the log, so your log is complete.
If you have recorded it with some other device and you can get the data in TCX or GPX format you can import it through Dropbox
If you just want to enter it manually, go to the second tab, the "Log view", and tap the calendar icon on the top right. Then pick the date of the missed session and tap the "+" button.
If you tap the "+" button on the past date you can enter a session manually, if you tap it while a future date is selected you can schedule a workout
Dropbox support (importing TCX files)
Through Dropbox you can import workout sessions recorded with other devices and saved as TCX or GPX files
In general TCX is preferred as it can have more information than GPX
Authorize the app in Settings->Social and Export -> Dropbox
Import and bulk import is performed from the folder "~/Dropbox/Apps/iSmoothRun/Import".
Place your files there. Then tap the import icon, (Log Tab, cloud with downward arrow). Files successfully imported are placed in folder "~/Dropbox/Apps/iSmoothRun/Import/Imported". If some files are left over (not imported) try one more time, juts tap "import" again because it might have been a network error.
Training plans saved in TCX format can also be imported with the same method. The scheduled workouts will appear in the Calendar Log view on the respective dates. Workouts scheduled for the current date, one day before and one day after will also appear in the workouts list
RunKeeper support
Upload to RunKeeper
The app can upload to RunKeeper, either manually or automatically at workout end. It can also support "RunKeeper Live" for RK Elite users. The update interval for RK Live usage is two minutes
Problems connecting with RK
During RK authentication please use user/password, and not Facebook. If you have never used a password for RK you can set it up in your RK page->My Settings->Password
Treadmill runs
RunKeeper doesn't support posting of non GPS data. Treadmill runs are exported only with the summary values. If a HRM was used then the HRM vs Time graph is also exported.
Time-Distance discrepancies between iSR and RK
Runs posted by iSR might have small distance discrepancies when posted to RK. The reasons are:- RK recalculates run summary based on the data we post. It applies it's own filtering to the data
- Since RK doesn't support non-GPS data, we can't export data from the pedometer.
- We do export pauses, but RK nevertheless does some post processing, thus you might get small discrepancies also in time.
Calculation of Calories
Calculation of calories burned is done based on approximate formulas and can be very rough. RK recalculates and you can see differences. If however a HRM is used, we use heart rate info for a much more accurate and personalised calculation (RK doesn't use HR data).
Using Displays
Support for Pebble, Echo and RFLKT is obsolete. It depends on third party libraries that are not supported any more by their manufacturers, so it can be removed at any time.
Supported Displays
The app supports the Pebble Smart-watch, the Magellan Echo Smart-watch and the Wahoo RFLKT and RFLKT+ displays
In order to use one of the displays you have to set it up at Settings->Displays.
Pebble
iSmoothRun uses our own pebble iSMoothRun app
Our own pebble app provides a recording screen were you can add as many pages you want with customizable metrics, along with a watch face that displays you weekly totals for your top three activities.
The pebble watch has to be paired with the phone using the pebble app
In iSmoothRun enable pebble in settings->Displays->Pebble
Magellan Echo
You can pair your Echo in settings->Displays->Magellan Echo. Press the top left button of the watch and wait for the app to find it. Then press "Pair with display"
Setup
Using the "Inverted" switch you can choose if the display will be black on white (normal) or white on black (inverted) when the app is in the recording state.
The display automatically inverts when the app is in the "Paused" state.
By Taping "Setup" you can define how many "pages" will be used, which "template" will be used for each page, and which "metrics" will be displayed.
Tap "+" or "-" to add or remove pages.
Tap "Change page Template" to change the template. There are three templates available that provide "one row", "two rows" and "three rows". Each row can display one metric.
Tap each metric on the watch to change it. The available metrics are:
"Lap Calories", "Calories", "Lap Count", "Lap Time", "Time", "Total time", "Time Of Day", "Time Ahead/Behind Target", "Distance", "Lap Distance", "Average Pace", "Lap Average Pace", "Split Average Pace", "Pace", "Average Speed", "Speed", "Lap Average Speed", "Max Speed", "Cadence", "Average Cadence", "Lap Average Cadence", "Steps", "HeartRate", "Heart Rate Zone", "Lap Average HR", "Average HR", "Lap Max HR", "Max HR", "Lap Min HR", "Min HR", "Power", "Altitude", "Ascend", "Lap Ascend", "GPS Signal".
Automatic pages
There are two more pages that are not user customizable and are automatically being displayed
The first one is a "Lap" page that pops up whenever the runner presses "Lap". It displays "Lap time", "Lap Distance" and "Lap average pace". It remains visible for 20 secs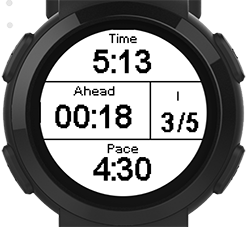
The second pops up whenever an interval is performed. It contains 3 rows and 4 metrics.
Top row displays a countdown. If the interval is time based it's a "reverse chronometer", or "reverse distance measurement" if the interval is distance based. So if you are performing a 800 m interval you 'll see the top metric starting at 0.8km and descending to 0.
In the second row you 'll see two metrics. The first one changes based on the Interval target. It's "Time ahead or behind" for a pace target, HR and HR Zone for a HR zone target and Power if power is the target. The second metric is the interval count e.g. 1/5, 2/5 etc.
The third row is "Cadence" for power targeted intervals, "Pace" for HR zone and pace targeted intervals.
Buttons
Echo buttons are mapped as:
- top left: light
- top right: start/pause music, double click next song
- bottom right: start,resume/pause
- bottom left: lap/advance interval
- screen tap: next page
Starting a run with Echo
You can start a run using the echo. Here is how to do it.- Setup the run as normal (Activity type, Workout, music etc)
- Press the top left Echo button to put it into search mode
- Tap "Check Sensors Status" in the app
- Watch the various sensors come alive and connecting as well as the Echo
- You can now press to phone's top hardware button to blank the screen and place the phone in the armband, waist belt etc
- You can confirm that the app is alive, by checking the HR value which is updated on the Echo
- To start the run simply press the start/pause Echo button bottom right
Wahoo RFLKT and RFLKT+ BTSmart display
Nearly all functionality described for the Magellan Echo applies to RFLKT as well. Automatic pages are not yet implemented.
Since RFLKT doesn't support screen tapping as input, the buttons are mapped as follows:
- top left: light
- top right: next page
- bottom right: start,resume/pause
- bottom left: lap/advance interval
Version info & known bugs
There are no known bugs